How to Develop iOS Applications A Practical UK Business Guide
How to Develop iOS Applications A Practical UK Business Guide
Before you even think about writing a single line of code, you need a rock-solid plan. This isn't the boring part; it's the foundation for everything. It’s where you define your app's true purpose, get to know your audience, and size up the competition. Skipping this step is the fastest way to build an app nobody wants.
From Idea to App Store: A Strategic Overview

Kicking off an iOS app project is far more than a technical task—it's a full-blown business venture. For UK businesses, the iOS platform is particularly appealing, thanks to a highly engaged user base with strong spending habits. But a brilliant idea is just the starting line. The journey from a lightbulb moment to a successful App Store launch is paved with careful planning and sharp strategic thinking.
This initial phase sets the stage for the entire project. I’ve seen too many teams rush into development, fired up by an idea, only to burn through time and money. The most successful projects always start by answering a few fundamental questions that guide every decision down the line.
What’s Your App's Core Purpose?
Before you get bogged down in features and flashy designs, you have to nail down your app's "why." What specific, nagging problem are you solving for your users? A crystal-clear purpose acts as your North Star, influencing everything from the technology you choose to the marketing messages you craft. Without it, you risk ending up with a jumble of features that don't add up to a compelling solution.
A well-defined purpose statement does more than just clarify your vision; it unites your development team. It ensures everyone is pulling in the same direction, which is your best defence against scope creep and helps keep the project laser-focused on delivering real value.
To really pin down your app's purpose, ask yourself these questions:
- What is the number one pain point we’re fixing? For instance, a fintech app might aim to make budgeting dead simple for freelancers.
- Who is our ideal user? Get specific. Think about their demographics, their daily frustrations, and what they need.
- What makes our solution different? You have to know what your unique selling point is in a crowded market.
To give you a clearer picture of the development journey, here's a look at the key milestones you'll encounter.
Key Project Planning Milestones
| Phase | Key Activities | Primary Goal |
|---|---|---|
| Discovery & Strategy | Market research, competitor analysis, defining core purpose, user personas. | Validate the app idea and establish a clear project roadmap. |
| UI/UX Design | Wireframing, prototyping, creating visual designs and user flows. | Design an intuitive, engaging, and visually appealing user experience. |
| Development & Implementation | Writing code, building features, setting up the backend and APIs. | Translate the design and strategy into a functional, working application. |
| Testing & QA | Unit testing, integration testing, user acceptance testing (UAT), bug fixing. | Ensure the app is stable, bug-free, and meets all requirements. |
| Deployment & Launch | App Store submission, creating marketing materials, launch planning. | Successfully release the app to the public and attract initial users. |
| Post-Launch Support | Monitoring performance, collecting user feedback, planning future updates. | Maintain app health, support users, and plan for long-term growth. |
This table outlines the typical lifecycle, but remember that each project will have its own unique path.
Understanding the UK Market Landscape
The UK mobile app market is a powerhouse, valued at roughly £28.3 billion and still on an upward trajectory. This creates massive opportunities, but it also means the competition is fierce. Diving deep into the existing apps in your niche isn't just a good idea—it's essential. This research helps you spot gaps in the market, understand what users now expect as standard, and avoid making mistakes others have already made.
Of course, a great strategy is nothing without the right people to execute it. Finding top-tier talent is a crucial part of your initial planning. If you're weighing up your options, our guide to hiring iOS developers in the UK is packed with practical advice.
Choosing Your Tech Stack: Native vs. Flutter
Once you've got your strategy locked down, the next big fork in the road is your technology. This isn't just a choice for your developers; it has a massive impact on your project's budget, timeline, and how you’ll manage the app down the line. For most UK businesses, the debate boils down to two main contenders: going native with Swift or choosing a cross-platform approach with Flutter.
Building with Swift, Apple’s own language, gives you direct, uncompromised access to every new feature the moment it drops on iOS. It's the gold standard for platform integration. But there's a big trade-off. Your code is completely tied to the Apple ecosystem. If you decide to launch on Android later, you’re looking at building a whole new app from the ground up, basically doubling your time and cost.
The Flutter Advantage for UK Businesses
This is where Flutter completely changes the game. Built by Google, Flutter is a toolkit that lets you build stunning, natively compiled apps for mobile, web, and desktop—all from a single codebase. For startups and SMEs trying to make every pound count, this "write once, deploy everywhere" model is a huge win.
Instead of juggling two separate teams and two codebases for iOS and Android, you only have one to worry about. The benefits are immediate: serious cost savings, a much faster route to market, and far simpler updates. You can hit that wider audience across both major platforms without the financial headache of running two native projects in parallel.
A common myth is that cross-platform means compromising on quality. That might have been true years ago, but modern benchmarks consistently show Flutter at the top for performance, often indistinguishable from a native app. Flutter apps compile directly to native ARM code, so there are no performance bottlenecks—just the smooth, slick experience iOS users demand.
Performance and User Experience
In the past, businesses were rightly concerned that a cross-platform app wouldn't feel quite right on an iPhone. Early frameworks often fumbled when trying to copy the fluid animations and unique UI elements that define the iOS experience. Flutter was built specifically to solve this.
It doesn’t use clunky web views or generic platform components. Instead, Flutter uses its own high-performance rendering engine, drawing every single pixel on the screen itself. This gives developers total creative control, leading to beautiful, brand-first designs that look and feel amazing on any device.
Here's what that means in practice:
- Exceptional UI Fidelity: Flutter's widget system makes it incredibly easy to build complex, bespoke user interfaces that run at a buttery-smooth 60 frames per second (or even 120 fps on newer ProMotion displays).
- Faster Development Cycles: A feature called "Hot Reload" is a developer's dream. It allows them to see code changes reflected in the app instantly, which dramatically speeds up building features and squashing bugs.
- Access to Native Features: Worried about losing access to the hardware? Don't be. Flutter has a robust way to talk to native platform APIs, so your app can still use the camera, GPS, Face ID, and other core device features without a problem.
Making the Right Decision
So, how do you choose? When should you stick with native Swift, and when is Flutter the smarter move?
| Consideration | Native Swift | Flutter |
|---|---|---|
| Target Platforms | iOS only | iOS, Android, Web, Desktop |
| Development Speed | Slower (separate codebases) | Faster (single codebase) |
| Cost-Efficiency | Higher (two teams needed for cross-platform) | Lower (one team, one codebase) |
| UI/UX | Perfect platform-specific feel | Highly customisable, excellent performance |
| Long-Term Maintenance | More complex (syncing features across platforms) | Simpler (one codebase to update) |
For a UK startup that needs to get a minimum viable product (MVP) out on both iOS and Android quickly to test the waters, Flutter is almost always the right answer. It keeps initial costs down while maximising your reach. Likewise, for an established SME aiming to refresh its mobile offering without a huge budget, Flutter offers a powerful, cost-effective path forward.
Ultimately, the goal is to build a fantastic app that hits your business targets. With its powerful mix of speed, performance, and cost-efficiency, Flutter makes a very compelling argument for any business serious about developing a modern iOS application. To get into the nitty-gritty, check out our step-by-step guide to developing an iOS application with Flutter.
Setting Up Your Development Environment
Right, you’ve got a solid strategy and you’ve picked your tech stack. Now it’s time to roll up your sleeves and set up your digital workshop. A smooth, properly configured development environment is the launchpad for your entire project. Get this right from the start, and you’ll save yourself countless hours of frustrating roadblocks later on.
This part of the process is very hands-on. Whether you’ve gone down the native Swift path or chosen the cross-platform power of Flutter, the goal is the same: get all your tools installed, talking to each other, and running like a well-oiled machine.
The Essential Toolkit for Flutter iOS Development
If you're aiming to build your iOS app with Flutter, your setup will involve a few key components working in harmony. Your main workspace will probably be a code editor like Visual Studio Code (VS Code), which is a popular choice for being lightweight, fast, and incredibly customisable.
Getting up and running involves a few steps:
- Install the Flutter SDK: This is the core toolkit from Google. You’ll download it directly from the Flutter website and add it to your system’s PATH. This little bit of configuration lets you run Flutter commands straight from your terminal.
- Configure Your Code Editor: If you’re using VS Code, the official Flutter extension is a non-negotiable. It adds powerful features like code completion, syntax highlighting, and debugging tools that make writing Dart code a whole lot smoother.
- Set Up the iOS Simulator: The simulator comes bundled with Xcode and lets you test your app on a virtual iPhone or iPad right on your Mac. You can run your Flutter app on it with a simple command, which is brilliant for quick UI checks without needing a physical device for every minor tweak.
This decision tree gives you a quick visual on the core choice between Flutter and native Swift, hinging on whether an Android app is also on your roadmap.
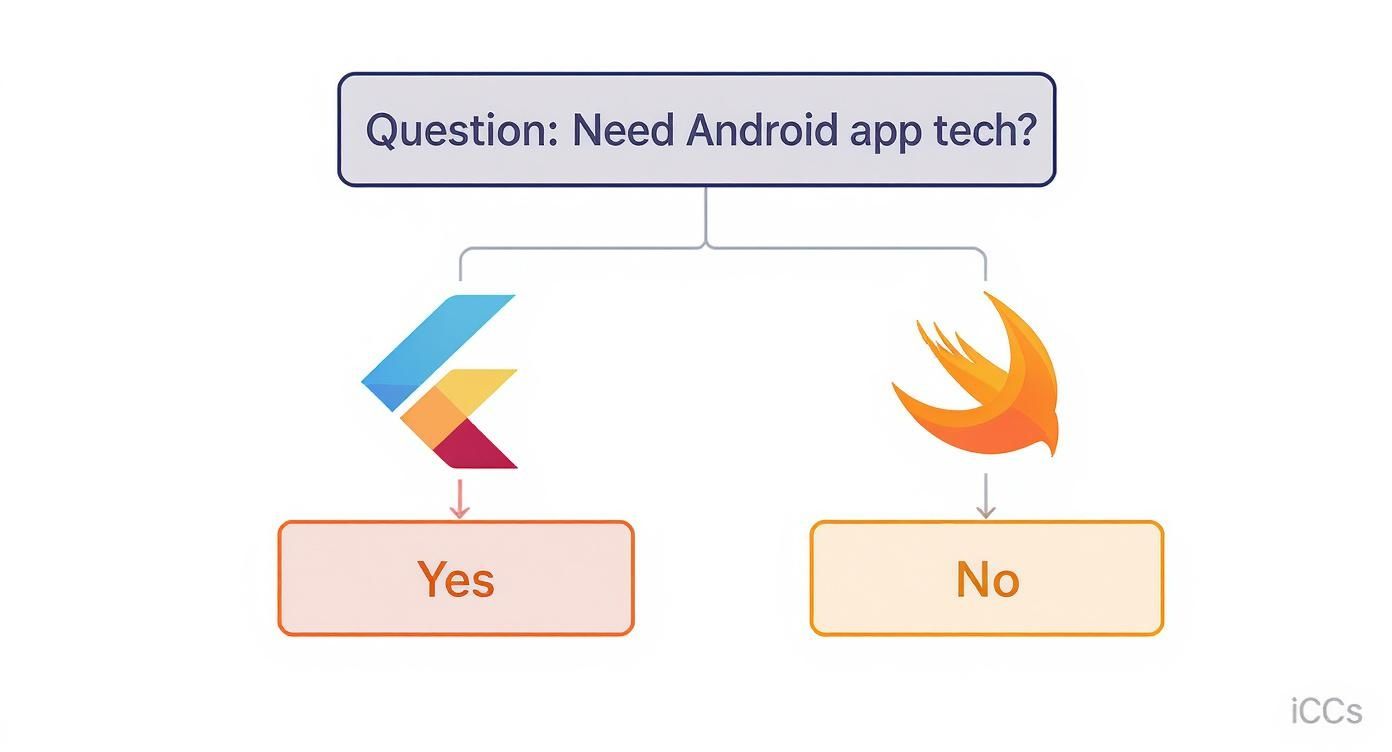
The key takeaway here is simple: if a cross-platform presence is part of your business strategy from day one, Flutter is often the most direct and efficient path forward.
Navigating Xcode: The Heart of iOS Development
Here’s a crucial point: no matter which path you choose—native Swift or Flutter—you cannot avoid Xcode. It’s Apple's official Integrated Development Environment (IDE) and the absolute command centre for all things iOS. Even if you're writing your app's UI entirely in Flutter, Xcode is essential for managing project settings, handling code signing, and ultimately, submitting your app to the App Store.
For Flutter developers, Xcode often just hums away in the background. You'll dip into it to configure app permissions (like camera or location access), set the app icon and launch screen, and prepare the final build for release. Think of it as the bridge connecting your cross-platform code to the native iOS ecosystem.
For those taking the native route, Xcode is where you'll live and breathe. It's where you’ll write your Swift code, design your UI with SwiftUI or Storyboards, and debug your application.
Once your environment is set up, a fantastic next step is to get your hands dirty and build your first iOS app with Swift and Xcode. There's no substitute for hands-on practice to really get a feel for the workflow. A well-organised environment isn't just nice to have; it's fundamental to an efficient development process.
Building a Production-Ready iOS App
Right, you’ve got your digital workshop set up. Now for the real work: turning those plans and designs into a living, breathing iOS app. This is where we move beyond the tutorials and start thinking like pros. Building a production-ready app isn't just about making something that looks good; it's about engineering a product that's robust, scalable, and won't give you headaches six months down the line.
The first rule of iOS development? Respect the user. Apple users have high expectations, shaped by years of using beautifully crafted software. This is why you absolutely must get familiar with Apple's Human Interface Guidelines (HIG). Think of the HIG not as a set of rules, but as the DNA of a great iOS app. Following these principles makes your app feel instantly intuitive and familiar, from the way it navigates to its subtle animations.
Crafting an Intuitive User Experience
Your app's first impression is its interface. A clean, responsive, and logical UI is completely non-negotiable. If you're using Flutter, you're in a great position. Its entire philosophy is built around composing your UI from a massive library of customisable widgets. This makes it surprisingly straightforward to create interfaces that feel perfectly at home on iOS, right down to the pixel-perfect navigation bars and that signature "bounce" scrolling effect.
But a great UI is more than just good looks. It’s about creating a smooth, frictionless journey for your users. Take a simple login screen as an example:
- Clear Calls-to-Action: Are the "Sign In" and "Register" buttons obvious? Can a user tell what to do in under a second?
- Helpful Feedback: When someone types the wrong password, don't just show a generic "Error." Tell them, "Incorrect password, please try again." It’s a small detail that makes a huge difference.
- Loading States: When the app is fetching data, show a loading spinner. This simple animation stops the user from thinking the app has crashed and reassures them that something is happening in the background.
These little touches are what separate an amateur app from a professional one. They build trust and make your product feel polished.
Architecting for Scalability with MVVM
As your app gets more complex, so does the code. Without a solid architecture, your codebase can quickly descend into a tangled mess of "spaghetti code," making it a nightmare to add features or fix bugs. This is where a modern application architecture like Model-View-ViewModel (MVVM) is an absolute lifesaver.
MVVM elegantly separates your app's logic into three distinct layers:
- Model: This layer is all about your data and business logic. It handles the core functions of your app, like fetching user profiles from a server or processing a payment. It's the brains of the operation.
- View: This is the user interface—everything the user sees and interacts with. In Flutter, this is your collection of widgets. The View’s only job is to display data and capture user input. It shouldn't contain any business logic.
- ViewModel: The ViewModel is the crucial go-between. It takes data from the Model, formats it perfectly for the View to display, and handles commands from the View (like a button tap).
This separation is incredibly powerful. It means you can completely redesign your UI (the View) without ever touching your business logic (the Model), making your code far more modular and much, much easier to test and maintain.
Implementing Core Features in Flutter
Let’s bring this into the real world. Imagine you're building an e-commerce app. Two of the most basic features you'll need are fetching product data from an API and managing the user's shopping basket.
Integrating with APIs
Virtually every app needs to communicate with a server to get dynamic data. In Flutter, you can use a package like http or the more powerful dio to make network requests to a REST API. Within an MVVM structure, your ViewModel would call a function in your Model (or a dedicated Repository class) to fetch the product list. Once the data comes back, the ViewModel processes it and notifies the View, which then updates itself to display the products.
Managing Application State So, what happens when a user taps "Add to Basket"? The app's state has changed, and the UI needs to react—maybe by updating a little badge on the basket icon. This is one of the central challenges in mobile development, and it’s known as state management.
Flutter has several brilliant solutions for this, with Provider and Bloc being two of the most popular. These tools help you manage and share your app's state cleanly and efficiently. For example, you could have a CartViewModel that holds the list of items in the basket. When a user adds a new product, the ViewModel updates its internal list and notifies any widgets that are "listening" for changes, causing them to automatically rebuild with the new information.
Choosing the right state management approach is a key decision in any Flutter project. For smaller apps, Provider offers simplicity and a gentle learning curve. For larger, more complex applications with intricate business logic, Bloc provides a more structured and predictable pattern that scales exceptionally well.
Don't underestimate the final hurdle: getting your app approved. The iOS App Store is home to about 1.96 million apps, and with over 450,000 new submissions last year, Apple's quality control is notoriously strict. In fact, less than 60% of apps get approved on their first try, which really highlights why building a high-quality, compliant app from day one is so critical. You can find more App Store statistics at sqmagazine.co.uk.
By focusing on a clean UI, a scalable architecture like MVVM, and a robust implementation of your core features, you're not just coding an app; you're engineering a product built for success on the App Store.
Mastering Testing and App Store Submission
So, you've built out the core features and the UI is looking sharp. It’s tempting to think you’re at the finish line, but the journey to a successful iOS app launch is far from over. This final stretch—testing and submission—is where many projects stumble.
A buggy app isn’t just an inconvenience; it can torpedo your brand's reputation before you’ve even had a chance to build it. Think of this stage as your final quality gate, the last check to ensure your app is stable, secure, and ready for its grand debut.
A proper testing strategy is the only way to catch issues early and often. It's not about randomly tapping through screens and hoping for the best. It's a structured process designed to validate every single piece of your application, from the tiniest function to the complete user journey. This layered approach is what guarantees a solid end product for your users.
A Layered Approach to Quality Assurance
When you’re working with Flutter, you can break testing down into three critical layers, each serving a very specific purpose. This isn’t just about finding bugs; it’s about building unshakable confidence in your codebase.
- Unit Tests: These are the microscopic checks. A unit test validates a single function or class completely on its own. For instance, you might write a test to confirm that a function calculating a 15% discount returns the correct value. They’re lightning-fast to run and form the bedrock of your entire testing pyramid.
- Widget Tests: This is one of Flutter's real superpowers. A widget test lets you check a single UI component—a button, a text field, a card—without needing to boot up the full application on a simulator. You can verify that tapping a button fires the right action or that a form field displays the correct initial text. It makes UI testing incredibly fast and efficient.
- Integration Tests: Here’s where you see the big picture. Integration tests run on a real device or simulator, automating user flows right through your complete app. A classic example would be a test that simulates a user logging in, adding an item to their basket, and proceeding to checkout. These tests confirm that all the individual pieces of your app are playing nicely together.
Automating these tests is absolutely vital for maintaining quality as your app grows and you add new features. To get a deeper insight, have a look at our guide on smarter app QA with automated testing services, which breaks down how to build a resilient testing pipeline.
Preparing for the App Store Review
Once your app is polished and has passed your rigorous testing, you face the final boss: Apple's App Store submission process. This is a meticulous procedure where a single oversight can lead to rejection and delay your launch.
First up, you need to create a compelling App Store listing in App Store Connect. This involves writing a clear, benefit-driven description, uploading high-quality screenshots that showcase your app’s best features, and choosing relevant keywords to help people find you. Don't rush this—your store page is your most important marketing tool.
Navigating Apple’s strict review guidelines is critical. Common reasons for rejection include crashes, incomplete metadata, misleading descriptions, and privacy violations. Familiarise yourself with their guidelines thoroughly to avoid common pitfalls and ensure a smoother review cycle.
On the technical side, you'll use Xcode to handle code signing and certificates, which are what verify your identity as the developer. From there, you'll archive your build—a process that compiles and packages your app—and upload it to App Store Connect for review.
For a detailed walkthrough of this crucial final stage, you can follow these 7 steps to successfully publish on the App Store. Following a checklist like this ensures all your hard work pays off with a smooth and successful launch day.
Sustaining Growth After Launch
Getting your app onto the App Store feels like crossing the finish line, but really, it’s just the start of the race. The most successful apps aren't just launched; they're meticulously nurtured and evolved over time. This post-launch phase is where you turn that initial flicker of interest into long-term user loyalty and sustainable growth.
Your focus needs to pivot immediately from building to listening. The second your app goes live, you gain access to the most valuable resource imaginable: real user data. This is no longer about what you think users want; it’s about what they're actually doing. This feedback loop is the engine that will drive every decision you make from here on out.
Monitoring App Performance and Stability
Before you can even think about growth, you have to make sure your app is solid. Nothing sends users running for the "uninstall" button faster than a crash-prone, buggy experience. Setting up robust monitoring isn't a nice-to-have; it's non-negotiable for understanding how your app behaves in the wild.
Tools like Firebase Crashlytics are your first line of defence. They give you real-time crash reporting, allowing your development team to pinpoint the exact line of code that caused a problem. This transforms bug fixing from a frustrating guessing game into a precise, data-driven process.
Alongside stability, you need to get a handle on user behaviour. Services like Google Analytics for Firebase offer powerful insights into:
- User Engagement: Which features are people actually using? Where are they spending their time?
- Retention Rates: Are users coming back after day one, week one, or month one?
- Conversion Funnels: Where are people dropping off during key moments like signing up or checking out?
This data helps you quickly identify your app's strengths and, more importantly, its weaknesses.
Remember, you've already made a significant investment to get the app built. That initial outlay must be protected by a continuous cycle of monitoring and improvement. A well-maintained app doesn't just retain users; it maximises your return on that investment.
Gathering Feedback and Planning Updates
Your users are your best source of ideas for what comes next. You need to actively encourage their feedback through App Store reviews, in-app feedback forms, and your customer support channels. Every review, whether it's glowing or scathing, contains a nugget of truth about the real-world user experience.
Start organising this feedback to spot common themes and recurring requests. When you combine this qualitative data with the quantitative data from your analytics, you have a solid foundation for your product roadmap. This ensures you're not just adding features for the sake of it, but solving real user problems and making your app genuinely better.
Automating Releases with CI/CD
As you start planning regular updates, you’ll find that the manual process of building, testing, and submitting to the App Store can become a massive bottleneck. This is where a Continuous Integration/Continuous Deployment (CI/CD) pipeline becomes your secret weapon.
CI/CD automates the entire release process. When a developer pushes new code, the pipeline can automatically run all your tests, build the app, and even deploy it to a testing track like TestFlight. This dramatically speeds up your update cycle, slashes the risk of human error, and allows your team to release new features and fixes far more frequently and reliably. This iterative approach is what keeps your app competitive and responsive to user needs, ensuring it doesn't just launch—it thrives.
Here is a simple checklist to keep you on track after your app is live.
Post-Launch Activity Checklist
| Activity | Tools to Use | Frequency |
|---|---|---|
| Crash & Error Monitoring | Firebase Crashlytics, Sentry | Daily |
| User Analytics Review | Google Analytics, Mixpanel, Amplitude | Weekly |
| App Store Review Analysis | App Store Connect, AppFollow | Weekly |
| Customer Feedback Collection | In-app forms, support tickets (Zendesk) | Ongoing |
| Competitor Analysis | App Annie, Sensor Tower | Monthly |
| Performance Audits | Xcode Instruments, Profiler | Quarterly |
| Plan & Release Updates | Jira, CI/CD (e.g., fastlane, Jenkins) | 1-4 Weeks |
This checklist isn't exhaustive, but it provides a solid framework for building a habit of continuous improvement, which is the true key to long-term success on the App Store.
Your Top iOS Development Questions, Answered
When you're gearing up to build a new iOS app, a few key questions always pop up. Let's tackle the most common ones we hear from businesses across the UK, cutting through the jargon to give you the practical answers you need.
How Much Does It Cost to Develop an iOS App in the UK?
This is the big one, and the honest answer is: it depends entirely on the complexity.
For a straightforward app with a core set of features, you might be looking at a starting point of around £15,000. But if your vision includes custom-designed interfaces, secure payment gateways, complex user profiles, and deep backend integrations, the budget will naturally climb, typically landing in the £30,000 to £70,000+ range.
One of the smartest ways to get more from your budget is by choosing the right technology from the start. A cross-platform framework like Flutter is often a more cost-effective route than native Swift, particularly if an Android app is on your roadmap. You build it once, and it runs beautifully on both platforms, saving a significant amount of time and money.
Why Choose Flutter Over Native Swift Development?
This is a crucial strategic decision, and there’s no single right answer—only what’s right for your project.
Swift is Apple's own language, so it offers unmatched performance and immediate access to the very latest iOS features as soon as they're released. If you're building an app that needs to squeeze every last drop of power out of an iPhone, like a high-end game or a processor-intensive video editor, Swift is a phenomenal choice.
On the other hand, Flutter is Google's toolkit for building beautiful, natively compiled apps for iOS, Android, and even the web, all from one codebase. For most businesses, Flutter’s main draw is a powerful combination of speed and efficiency. You can get to market on two platforms in nearly the time it takes to build for one, instantly doubling your reach for a much lower investment.
It's a common misconception that cross-platform means compromising on quality. The reality is the performance gap between Flutter and native has virtually disappeared for the vast majority of apps. Modern benchmarks show Flutter delivers the slick, responsive experience users demand.
How Long Does Apple's App Store Review Take?
The good news here is that Apple has become much faster over the years. These days, you can often expect an approval in just 24-48 hours.
However, it's wise to plan for a longer wait, especially for your very first submission or if your app operates in a regulated field like finance or healthcare. To keep things moving smoothly, you absolutely must get familiar with Apple's App Store Review Guidelines before you hit 'submit'. A simple, avoidable mistake is the most common reason for a rejection that could have been prevented.
Do I Really Need a Mac for iOS Development?
Yes, this one is non-negotiable. To publish an app on the App Store, you will need a Mac. Apple's entire development ecosystem, centred around its key software Xcode, runs exclusively on macOS.
Even if you're building with Flutter and can write all your code on a Windows or Linux machine, the final steps require a Mac. You'll need it to compile the final build for iOS, test it properly in the simulator, and use Xcode to submit it to the App Store.
Ready to bring your iOS app vision to life with the power and efficiency of Flutter? At App Developer UK, we specialise in creating high-performance, beautiful applications for businesses across the UK. Contact us today to discuss your project.