A Complete Guide to Testing Automation Training for Flutter Teams
A Complete Guide to Testing Automation Training for Flutter Teams
Investing in testing automation training isn't some optional extra for ambitious app development teams anymore. Honestly, it's a fundamental requirement for staying competitive. A team that knows their stuff can slash bug-fix cycles and get to market faster, turning quality assurance from a roadblock into a genuine advantage.
This guide lays out a complete blueprint for setting up a killer training programme specifically for your Flutter developers.
Why Testing Automation Training Is a Competitive Edge

Let's move beyond the simple "it saves time" argument. When you properly invest in automation training, you’re directly impacting what really matters: launching incredible Flutter apps faster, building rock-solid customer trust, and ensuring your projects are built to last. In a world where a flawless app is the baseline expectation, you can't afford to be reactive about quality.
The industry figures back this up. The UK software testing market hit £1.1 billion in 2023, with a steady growth of 4.2% each year since 2018. This boom is all about supporting the explosion in mobile apps, especially for high-performance frameworks like Flutter.
From Technical Task to Strategic Asset
The right training changes the entire conversation around automated testing. It stops being a chore for developers and becomes a powerful strategic asset for the whole business. When your team masters automation, they're not just squashing bugs; they're building a safety net that lets everyone innovate with more confidence and speed. That's where you find your edge.
Of course, this transformation doesn't just happen. It needs a plan. I’ve found that the best programmes are built on a few core pillars that guarantee your team doesn't just learn the tools, but truly adopts a quality-first mindset.
We can break down the essentials of a successful programme with a quick look at its core components.
Pillars of a Successful Automation Training Program
A quick look at the essential components of a comprehensive training plan that delivers real results for your Flutter team.
| Pillar | Objective | Key Focus Area |
|---|---|---|
| Curriculum Design | Build a structured learning path from basics to advanced techniques. | Foundational concepts, Flutter-specific test writing, and refactoring. |
| Practical Application | Solidify theoretical knowledge with real-world practice. | Hands-on labs, sample project integration, and debugging exercises. |
| Tool Proficiency | Achieve mastery of essential testing tools and frameworks. | Flutter's testing suite (flutter_test, integration_test), Mockito, and BDD tools. |
| CI/CD Integration | Embed automated quality checks directly into the development pipeline. | Setting up automated test runs in GitHub Actions, Jenkins, or GitLab CI. |
By building skills across these areas, your team will be equipped to handle quality right from the very first line of code.
Empowering your developers with these skills means they take ownership of quality from the get-go. This proactive approach is always more efficient and cost-effective than frantically hunting down bugs after a release.
To get a handle on the core ideas, you can learn more about what automated testing is and how it can boost your software quality in our detailed guide. The impact is huge across all sorts of sectors. For a concrete example, check out this story detailing test automation success in healthcare, which shows just how valuable this is in a mission-critical environment.
This guide will give you the blueprint to see those same kinds of results for your own Flutter team.
Designing a Practical Flutter Testing Curriculum
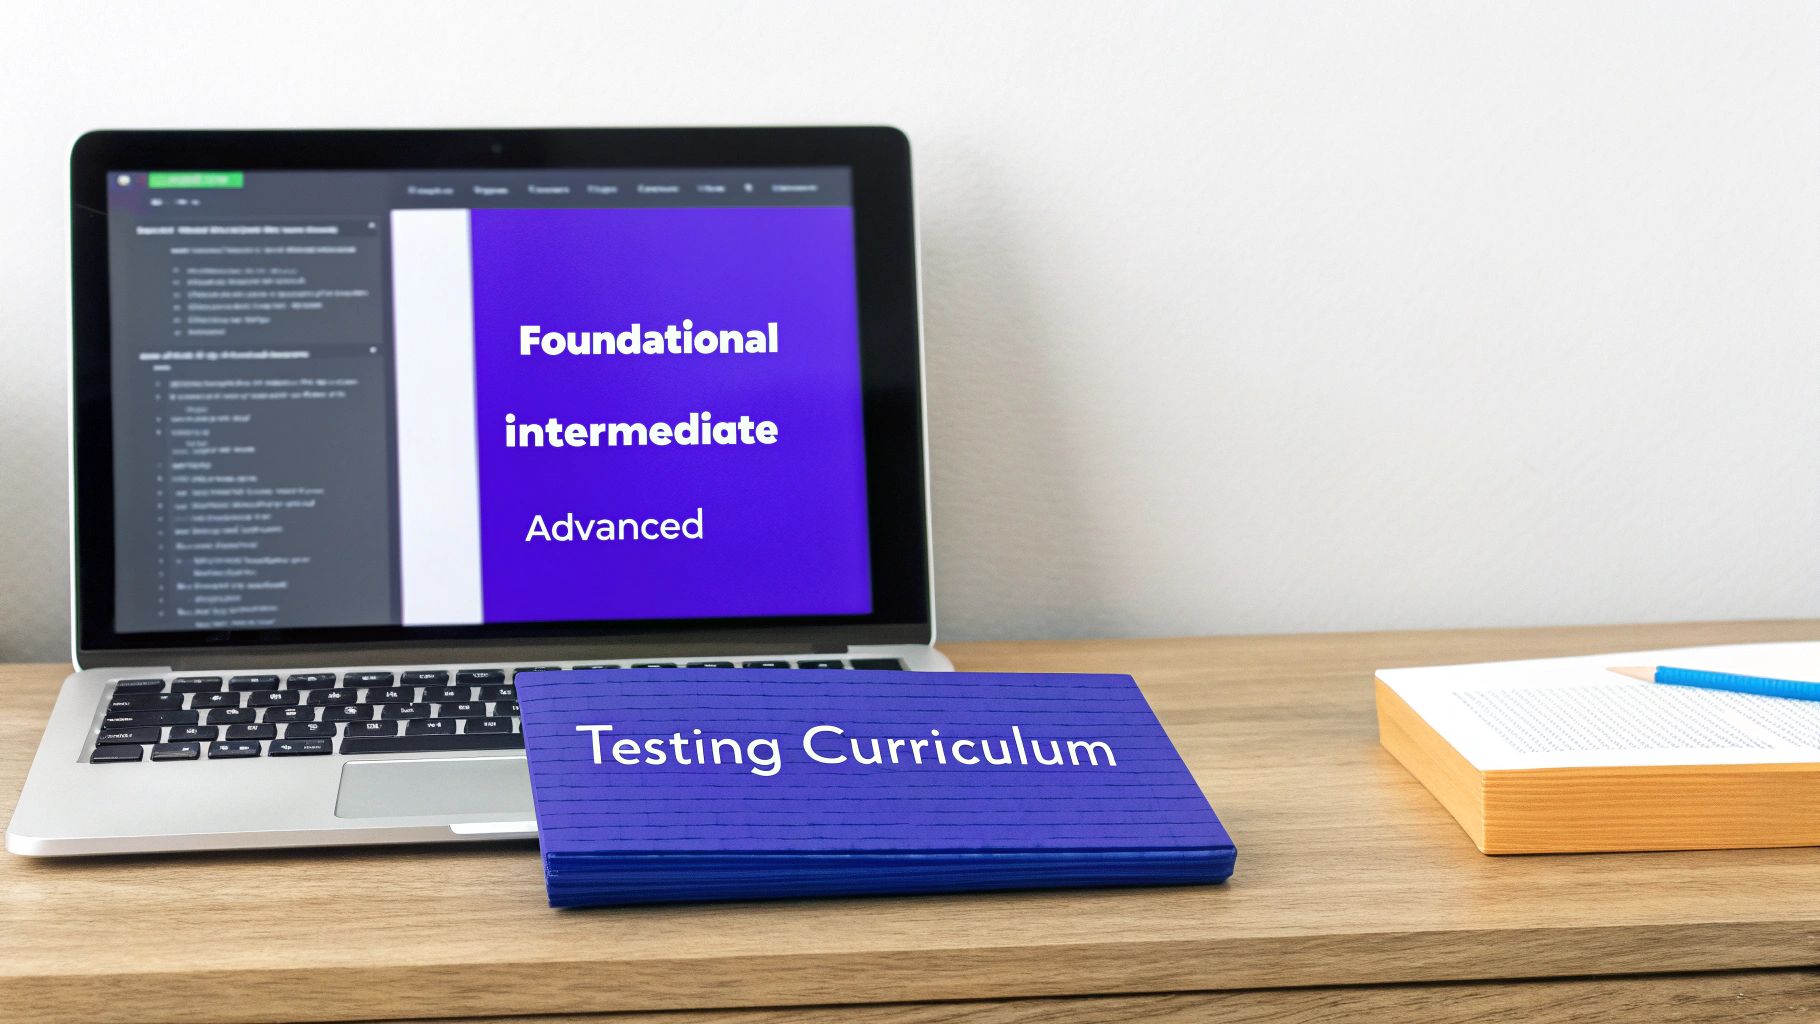
Any successful testing automation training programme lives or dies by its curriculum. You can’t just throw a random collection of tools and techniques at your team and hope something sticks. What you need is a clear, tiered learning path that builds skills logically, from the ground up.
For Flutter developers, this means starting with the absolute essentials before layering on complexity. Crucially, every concept needs to be tied back to practical, real-world application. This way, developers don't just learn how to write tests; they build confidence and start to cultivate an instinct for quality, understanding why certain tests are so vital for a solid app.
Make no mistake, automation is changing the game in the UK's software testing scene. Manual testing is on the decline as automated solutions take centre stage in an industry set to be worth £1.3 billion in 2025. This isn't surprising when you consider the complexity of modern apps, especially high-performance, cross-platform ones built with Flutter that have to run perfectly on iOS, Android, and the web.
Foundational Skills: The Bedrock of Flutter Testing
Every solid testing practice is built on a strong foundation. This first stage of the curriculum is all about demystifying core concepts and getting comfortable with Flutter's fantastic built-in tools. We want to get developers thinking in terms of the testing pyramid.
Here, the focus is squarely on what Flutter gives you right out of the box, rather than jumping into third-party frameworks. Flutter consistently tops performance benchmarks for a reason, and its native testing suite is a big part of that efficient ecosystem.
Your key learning objectives at this stage should be:
- Dart Essentials for Testing: Nailing down the language features that are critical for writing good tests, like null safety and asynchronous programming (
async/await). - Unit Testing: Writing lightning-fast, isolated tests for individual functions and classes. This is where the team learns to break down logic into small, testable units.
- Widget Testing: This is one of Flutter’s killer features. Mastering how to test individual widgets in a controlled environment to check UI and interaction without firing up an emulator.
- Introduction to Integration Testing: Getting a feel for how to test the connections between different classes or widgets to make sure they play nicely together.
If you’re pulling this curriculum together, it’s worth thinking about how to create engaging training materials to make sure the lessons land effectively with your team.
Intermediate Modules: Tackling Real-World Complexity
Once your team has the basics locked down, it's time to level up and tackle the kind of messy, complex scenarios they'll actually encounter on a project. This intermediate tier moves past simple widgets and into the world of state management, external services, and network requests.
This is the point where developers learn to handle the dynamic, interconnected nature of a real app. Without these skills, their testing is stuck in the shallow end of the pool, limited to only the simplest parts of the codebase.
The moment a developer can confidently write a test for a complex screen that pulls data from multiple services, that’s when the value of automation really clicks. They've moved from theory to a practical, project-saving skill.
At this level, your training should dig into:
- Testing State Management: Writing robust tests for common patterns like BLoC or Provider to guarantee the UI updates correctly when the state changes.
- Mocking Dependencies: Using libraries like Mockito to isolate tests from things like databases or network calls. This makes tests faster and way more reliable.
- API Layer Testing: Verifying that the app can correctly fetch data, parse JSON responses, and gracefully handle API errors.
And if your team needs a quick refresher on the basics, our developer's guide to the basics of testing in Flutter is the perfect companion piece for this foundational stage.
Advanced Concepts: Mastering End-to-End Quality
The final tier is for developers who are ready to take full ownership of app quality, from a single line of code all the way to the complete user experience. Here, we introduce the advanced frameworks and concepts that ensure an app isn't just functional, but also performant and pixel-perfect.
This is all about simulating the entire user journey. Advanced tests validate that all the individual components—UI, state management, and backend services—come together to create a seamless experience on a real device.
Your focus areas for this advanced stage should include:
- End-to-End (E2E) Testing: Getting hands-on with modern frameworks like Patrol to write reliable, scriptable tests that mimic how a real person would use the app from start to finish.
- Performance Profiling: Teaching developers how to use Flutter's DevTools to hunt down and fix performance bottlenecks related to rendering, memory, and CPU usage.
- Visual Regression Testing: Setting up automated checks that catch unintended UI changes by comparing screenshots of widgets and screens over time. It’s a lifesaver for catching subtle visual bugs.
By structuring your testing automation training across these three tiers, you give your team a clear path for growth. They'll progress from simply writing tests to truly engineering quality into your Flutter apps right from the very beginning.
Choosing the Right Tools for Your Flutter Test Stack
Picking the right tools for your Flutter testing stack is a massive step in getting your team's test automation training off the ground. The ecosystem is packed with options, but the real goal isn't to bolt on every shiny new tool you find. It's about building a practical, effective toolchain that actually solves your project's problems without burying your team in complexity.
Your journey should always start with Flutter's own native testing suite. It’s exceptional. There’s a reason Flutter consistently hits high-performance benchmarks—its tooling is tightly integrated and incredibly efficient. The testing framework is no different, providing a powerful foundation that should honestly handle 90% of your automation needs. Resisting the impulse to immediately grab a third-party tool for every little task is a sign of a mature testing strategy.
Getting to grips with Flutter's built-in testing capabilities is non-negotiable. This graphic from the official Flutter docs perfectly illustrates the core testing types.
This visual breaks down the classic testing pyramid for Flutter. You can see how the fast, isolated unit tests form the broad base, followed by more comprehensive widget tests, and then a small, focused number of full integration tests at the very top. It’s a great reminder to push tests as far down the pyramid as you can to keep things fast and reliable.
Flutter’s Native Testing Suite
A huge chunk of your team's training needs to be dedicated to mastering the three pillars of Flutter's built-in testing framework. Each one has a distinct job, and knowing when to use which is the secret to writing efficient and meaningful tests.
- Unit Tests: Think of these as your first line of defence. They're lightning-fast tests that check a single function, method, or class in total isolation from the UI or anything external. Perfect for your business logic, data models, and service classes.
- Widget Tests: This is where Flutter really flexes its muscles. Widget tests let you check a single widget's behaviour and look without needing to boot up the whole app on an emulator. You can fake user interactions like taps and scrolls and then check that the UI updates exactly as you expect.
- Integration Tests: These are the big ones. They run on a real device or an emulator to verify a complete user flow or how several parts of your app work together. They’re powerful, but they’re also slower and more resource-hungry, so you should save them for your most critical user journeys.
Expanding Your Toolkit with Third-Party Libraries
While Flutter’s native suite is fantastic, some situations just call for more specialised tools. A well-rounded training programme should introduce third-party libraries not as replacements, but as powerful supplements that fix specific problems.
A common mistake I see is tool overload. The best test stacks are lean, combining Flutter's native power with a few carefully chosen libraries to fill specific gaps. Master the fundamentals first, then expand.
The most critical area you’ll want to augment is end-to-end (E2E) testing. While Flutter has its integration_test package, modern frameworks like Patrol offer a much more robust and developer-friendly experience. Patrol brings features like native UI interaction (think tapping system permission pop-ups) and much simpler test scripting to the table, making it a clear winner for complex E2E scenarios.
Another must-have is Mockito, a hugely popular mocking library. It lets you create fake versions of your dependencies—like an API client or a database repository—so you can test your code in isolation. This keeps your tests fast, predictable, and free from external flakiness.
Building Your Ideal Flutter Test Stack
To make the right call, you have to weigh your options against your project's scale and your team's current skills. There’s no silver bullet here; the right stack is all about balancing power with simplicity.
Here’s a quick overview of how some of the main tools stack up and where they fit into a typical workflow.
Flutter Testing Tool and Framework Comparison
This table offers a comparative overview of essential testing tools, helping you select the right combination for your Flutter projects.
| Tool/Framework | Test Type | Best For | Key Advantage |
|---|---|---|---|
| flutter_test | Unit & Widget | Logic, individual UI components, state changes. | Extremely fast, deeply integrated with Flutter's framework. |
| integration_test | Integration | Verifying multi-widget flows on a device. | Official Flutter support for on-device testing. |
| Patrol | End-to-End (E2E) | Simulating full user journeys and native interactions. | More reliable and feature-rich than older E2E tools. |
| Mockito | All Types | Isolating code from external dependencies. | Simplifies testing complex classes by creating mock objects. |
The right tools create a solid foundation, but they need to be integrated into your development lifecycle to be truly effective.
For the CI/CD pipeline, platforms like Codemagic and GitHub Actions are perfectly optimised for Flutter. They offer pre-configured workflows that make it straightforward to run your entire test suite automatically on every pull request. This provides immediate feedback and helps maintain a high standard of quality across the board. Training your team to use these platforms is the final piece of the puzzle, turning your test suite into an automated safety net that catches bugs before they ever reach your users.
Integrating Automation into Your CI/CD Pipeline
Knowing how to write automated tests is one thing, but making sure they run consistently is a whole different ball game. This is where a solid Continuous Integration and Continuous Deployment (CI/CD) pipeline comes into its own. It’s what turns your test suite from a bunch of scripts into an automated quality gatekeeper that’s always on watch.
The goal here is simple: make quality an automated, non-negotiable part of your team's daily rhythm. We’re going to walk through a real-world scenario for a Flutter app, showing you how to set up a pipeline that automatically runs your tests, spits out reports, and deploys builds when everything looks good. This approach helps you build a culture where bugs are caught early, letting your developers get on with building great features instead of firefighting.
Choosing Your CI/CD Platform
When it comes to Flutter development, two platforms really shine because of their fantastic support and straightforward setup: GitHub Actions and Codemagic.
- GitHub Actions: If your code already lives on GitHub, this is an absolute no-brainer. It's incredibly customisable, backed by a huge community, and has a very generous free tier for both public and private repositories.
- Codemagic: This is a CI/CD tool built from the ground up for mobile apps, and its Flutter support is second to none. It often makes configuration a breeze with its friendly UI and ready-made workflows for common Flutter jobs.
For this guide, we'll stick with GitHub Actions because it's such a versatile and common starting point. Don't worry, though—the core ideas we cover apply to just about any modern CI/CD platform.
A Practical GitHub Actions Workflow
Let’s set up a classic workflow: one that kicks off every single time a developer opens a pull request. This process will grab the code, spin up a Flutter environment, and run all your unit and widget tests. It gives immediate feedback right where it’s needed, making sure dodgy code never gets merged.
This diagram shows how it all fits together, from Flutter's built-in testing tools and advanced frameworks like Patrol, right through to the final CI/CD pipeline.
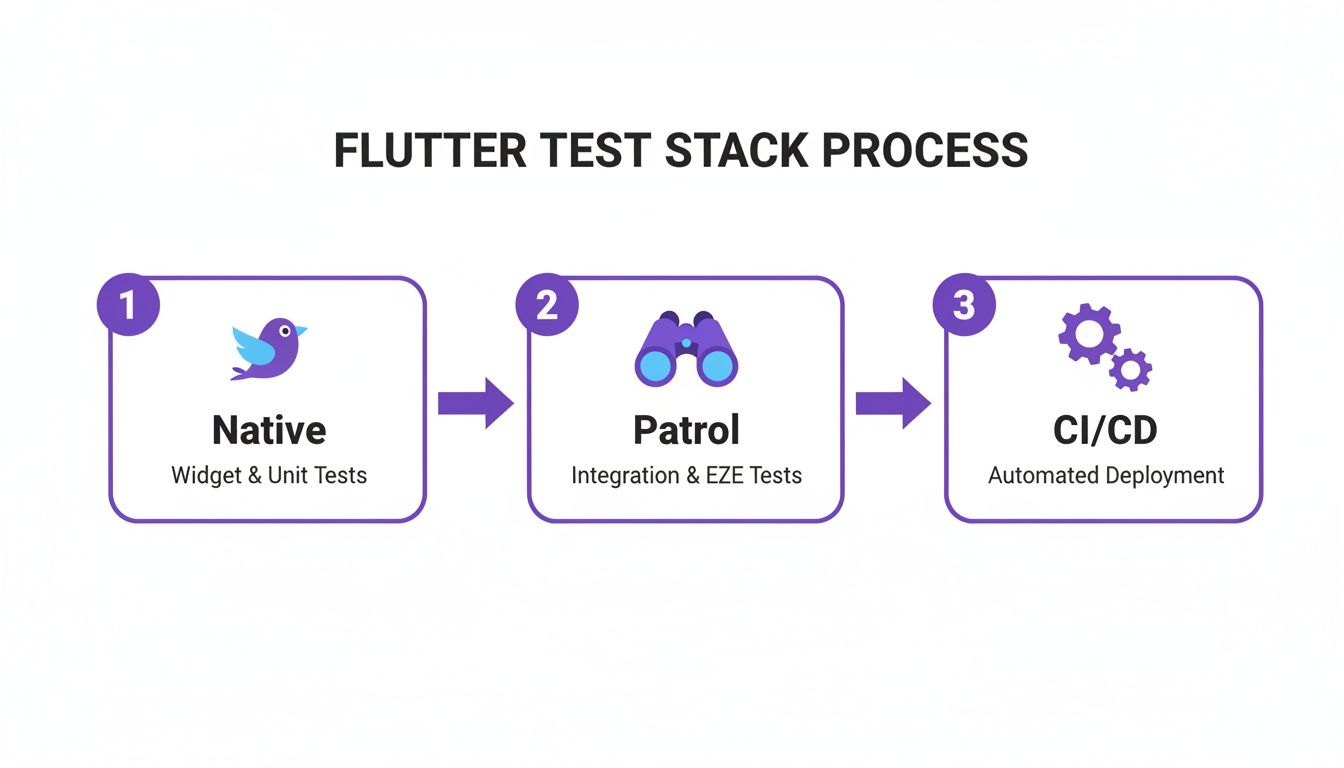
You can see the logical flow here, moving from basic native tests to more involved E2E checks with Patrol, with everything feeding into an automated deployment pipeline. It’s a powerful setup.
Building Your Workflow File
To get started, you’ll need to create a YAML file in your project’s .github/workflows/ directory. This file is the recipe that tells the automation what to do.
Here’s a simple starter configuration to run your Flutter tests:
name: Flutter CI
on:
pull_request:
branches: [ main ]
jobs:
test:
runs-on: ubuntu-latest
steps:
- uses: actions/checkout@v3
- uses: subosito/flutter-action@v2
with:
channel: 'stable'
- run: flutter pub get
- run: flutter analyze
- run: flutter test
Let's quickly break down what's happening:
name: Flutter CI: Just a clear, human-readable name for your workflow.on: pull_request: This tells the workflow to trigger whenever a pull request is opened or updated on themainbranch.jobs: test:: This defines a 'job' calledtestwhich will run all our steps.runs-on: ubuntu-latest: We're telling GitHub to use a fresh virtual machine running the latest Ubuntu for this job.steps:: This is the real meat of it. The commands run in order: check out the code, set up the Flutter SDK, install dependencies (flutter pub get), run static analysis (flutter analyze), and finally, run all your tests (flutter test).
This simple file is your first, most important step. If you want to go deeper into the setup, our detailed article on what continuous integration for Flutter apps entails is a great next read.
Expanding Your Pipeline with Code Coverage
Once your tests are running automatically, you need to know how effective they are. That's where code coverage comes in. It generates reports showing exactly which lines of code your tests are actually hitting, instantly highlighting any gaps.
You can tweak your workflow to generate a coverage report and even upload it for easy viewing. It just requires a small change to the test command.
Running flutter test --coverage creates a lcov.info file inside a new coverage directory. You can then use another GitHub Action to parse this file and post the results as a comment directly on the pull request. Neat, right?
Remember, integrating code coverage isn't about chasing an arbitrary 100% target. It's about starting a conversation about quality. It helps the team make smart, informed decisions about where to focus their testing efforts for the biggest impact.
This closes the loop beautifully. Developers see the direct impact of their tests on overall quality before their code is even close to being merged. This is a critical part of any successful testing automation training because it connects the abstract act of writing tests to concrete, measurable results.
Ultimately, weaving automation into your CI/CD pipeline is what makes the training stick. It elevates testing from a manual chore that's easy to forget into an essential, unavoidable part of your development process, ensuring every release is more solid than the last.
Measuring the Real-World Impact of Your Training
So, you've run the training programme. Everyone's completed the modules. Job done? Not quite. The real test begins now. The true value of your investment isn't found in a course completion certificate; it's seen in tangible, measurable improvements to your entire development process.
To really prove the training's worth to stakeholders, you need to shift the conversation from training outputs to business outcomes. We're talking about a direct line from upskilling your team to a noticeable drop in post-release bugs, fewer hours wasted on manual regression, and faster, more reliable deployments. This isn't just about training; it's about making a strategic investment with a clear, data-driven return.
This whole area is booming for a reason. In the UK, the software testing services industry is on track to hit a massive £1.3 billion in 2025. A huge part of that growth comes from embedding testers with developers right from the start of a project—a practice that quality automation skills make possible. You can dig deeper into this and other software testing industry insights on Ibisworld.com.
Key Performance Indicators for Training Success
To see if you're moving in the right direction, you need to define a few solid Key Performance Indicators (KPIs). The trick is to track these both before and after the training kicks off. This gives you a clear baseline to show just how far you've come.
Your goal is to demonstrate a positive trend over time. I’d suggest starting with the metrics that shout "quality" and "efficiency" the loudest:
- Defect Escape Rate: This is the big one. It's the number of bugs that sneak past your testing and get into the hands of your users. A successful training programme will cause a significant decrease here as your new automated tests start catching issues earlier.
- Manual Testing Time: Keep a close eye on the hours your team sinks into repetitive manual regression testing for each release. As your automated test suites grow and become more reliable, this number should absolutely plummet. This frees up your team for more creative and valuable exploratory testing.
- Test Code Coverage: It’s not a silver bullet, but tracking a steady increase in code coverage is a good sign. It shows your team is actually applying their new skills and building a more robust safety net around the codebase.
- Build Failure Rate: Watch how often your CI/CD pipeline breaks because of test failures. You might see a little spike at first as people get the hang of things, and that's totally normal. But over time, this should level off and then drop as the code quality improves before it even gets merged.
Visualising Progress with a Simple Dashboard
Gathering the data is step one, but presenting it in a way that people can understand instantly is just as crucial. You don't need a fancy business intelligence tool to make an impact. Honestly, a simple dashboard in a shared spreadsheet or a basic reporting tool can make the results of your training crystal clear.
Focus on showing trends. A simple line chart plotting the defect escape rate month-on-month can be incredibly persuasive. Pair that with a bar chart showing the reduction in hours spent on manual testing, and you've got a powerful story of improved efficiency.
The most compelling story you can tell is one backed by data. When you can walk into a meeting and say, 'Since we implemented this training, our critical production bugs are down by 40%,' you’ve proven the value of your investment beyond any doubt.
This data-driven approach lets you have much more meaningful conversations with leadership. It changes the narrative from the cost of a training course to the incredible value it delivers. We're talking better product quality, faster development cycles, and a more confident, capable team. It's the ultimate proof that investing in your people is one of the smartest business decisions you can make.
Your Top Questions About Flutter Test Automation Training
When you start planning a test automation training programme, a few practical questions always pop up. It’s best to get these answered upfront so everyone on the team knows what to expect and feels ready to dive in.
Let's walk through some of the most common ones I hear.
How Long Does It Take to Train a Developer?
Honestly, it really depends on where they're starting from. If you have a developer who's already comfortable with Flutter and Dart, they can get the hang of basic unit and widget testing in just a week or two of dedicated learning. It's a pretty quick win.
Moving up to an intermediate level—where they can confidently mock dependencies and test API layers—that’s probably going to take about four to six weeks. To truly master advanced, end-to-end automation and get it all running smoothly in a CI/CD pipeline, you're looking at a more continuous journey. But a developer can build a really solid level of skill in about three to four months. The secret ingredient is consistent practice on real-world projects.
What Is the Biggest Initial Challenge?
Nine times out of ten, the biggest roadblock isn't technical; it's cultural. The real challenge is shifting the team's mindset. You have to move away from thinking of testing as that final, painful step before a release and start seeing it as something that's woven into the development process from day one.
I see it all the time: developers struggle to find time for writing tests when project deadlines are tight. The best way around this is to start small. Make it a rule that all new features must have tests. From there, you can gradually work backwards to cover your most critical existing code. When the team sees those small wins and understands the long-term payoff, you'll build the momentum you need.
The biggest mindset shift is from "Do I have time to write tests?" to "Do I have time not to write tests?" Once the team sees how much rework and late-night bug fixing automation prevents, its value becomes self-evident.
Can We Automate Everything in Our Flutter App?
While it’s a noble goal, trying to automate 100% of your app is usually impractical and, frankly, not a great use of your time. Some things just need a human eye.
Think about subjective user experience (UX) feedback, checking complex custom animations, or testing features that rely on specific hardware. A person is always going to be better at that. The smart approach is to automate the repetitive, critical user journeys—things like login flows, payment processing, and core business logic. Save your manual testing efforts for exploratory checks and those subjective elements.
Is It Better to Use Flutter's Tools or Third-Party Ones?
This isn't really an either/or situation. The most effective testing strategies I've seen use a smart combination of both. Flutter’s built-in testing frameworks for unit and widget tests are incredibly powerful and fast. They should absolutely be the foundation of your test suite for checking individual components and logic. We can't forget that new benchmarks consistently place Flutter at the top for performance, and its tightly integrated tooling is a big part of that success.
However, when you get to the more complex end-to-end (E2E) tests that simulate a full user journey, modern third-party tools like Patrol often provide more robust features and greater stability.
So, the ideal setup is this: use Flutter's native tools for the vast majority of your tests (the base of your testing pyramid) and then bring in a dedicated E2E framework for your most critical, high-level user flows. This balanced approach gives you the best of both worlds—blazing speed and comprehensive coverage.
Ready to build a high-performance, future-proof Flutter app backed by a solid quality strategy? The expert team at App Developer UK is here to help bring your vision to life. Contact us today to discuss your project.