Develop iOS Application with Flutter: Step-by-Step Guide
Develop iOS Application with Flutter: Step-by-Step Guide
Diving into iOS app development is a fantastic move, but the very first decision you make—your tech stack—is arguably the most important. For any UK business I talk to, the goal is always the same: build something brilliant, fast, without breaking the bank. This is exactly where a framework like Flutter shines. It lets you build a high-performance, visually stunning app from just one codebase, which is a massive win for saving time and money.
Your Blueprint for a High-Performance iOS App
Building an app for the iOS ecosystem is a strategic choice. The Apple App Store is a goldmine of highly engaged users who are more willing to spend, making it a seriously lucrative platform. The catch? Traditional native development often means double the work, requiring separate teams and codebases for iOS and Android. It’s expensive and slow.
This is the problem Flutter was built to solve. As a UK-based Flutter development agency, we've seen its power firsthand. It's not just hype; recent performance benchmarks consistently show Flutter apps running at the top, delivering a smooth, native-like experience that often outperforms other cross-platform frameworks. That's not just a nerdy technical win—it translates directly into a buttery-smooth, responsive experience for your customers.
To give you a clearer picture of the journey, here’s a typical project flow we follow:
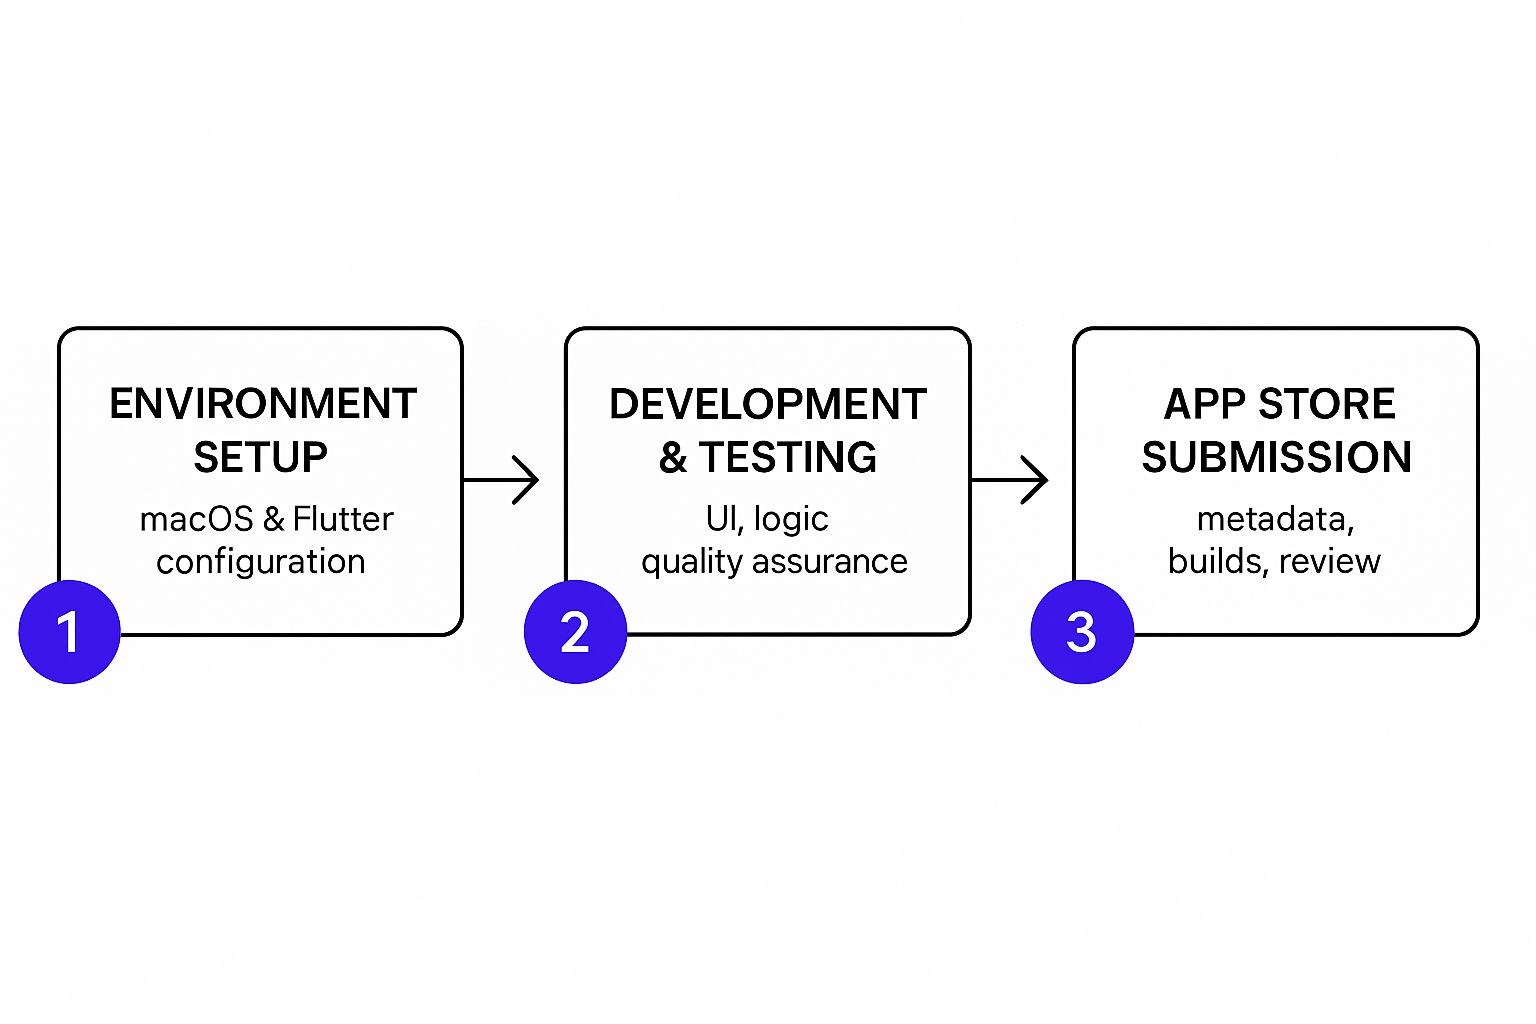
This map lays out the core phases, from the initial setup all the way to hitting ‘submit’ on the App Store. Think of it as your roadmap from idea to launch.
The Flutter Advantage for iOS
Picking Flutter is about more than just getting the job done efficiently today; it’s a smart move for the future. With Google’s backing and a massive, active community, the framework is constantly evolving. You're not just adopting a tool; you're plugging into an ecosystem that ensures your app stays modern and easy to maintain.
Here’s why we’re so confident in it:
- Proper Native Performance: Flutter apps don't mess around. They compile directly to native ARM code, talking straight to the device's hardware. There’s no clunky JavaScript bridge slowing things down, which is the secret sauce for achieving those silky smooth 60fps animations that feel truly native.
- Serious Cost and Time Savings: Why build two apps when you can build one? A single codebase means your development time is slashed, and so are the costs. One team can build, test, and ship for both iOS and Android at the same time. It's a game-changer.
- Beautiful, Pixel-Perfect UIs: Flutter’s widget system is a designer's dream. It gives developers total control over every single pixel on the screen. This allows us to craft gorgeous, brand-consistent interfaces that look and feel perfect on every iPhone, from the SE to the Pro Max.
To give you a bird's-eye view, the development journey with Flutter is a well-structured process. We've summarised the key stages into a simple table to show how an idea evolves into a polished iOS application ready for the App Store.
Flutter Development Lifecycle for iOS Apps
| Phase | Key Objective | Core Tools & Technologies |
|---|---|---|
| Discovery & Planning | Define app goals, target audience, and feature set. | Figma, Miro, Trello, User Personas |
| UI/UX Design | Create intuitive wireframes and high-fidelity mockups. | Flutter Widgets, Material Design, Cupertino |
| Development | Write clean, scalable code for core app functionality. | Dart, Visual Studio Code, Android Studio, Git |
| Testing & QA | Identify and fix bugs across different iOS devices. | Flutter Driver, Widget Tests, Firebase Test Lab |
| Deployment | Prepare and submit the app to the Apple App Store. | Xcode, Fastlane, TestFlight, App Store Connect |
Each phase builds on the last, ensuring a robust and methodical approach to development. This structured lifecycle is key to launching a high-quality app on time and on budget.
By committing to a unified development process with Flutter, you’re setting yourself up to launch a premium iOS app faster and more economically than you ever could with traditional methods. For any business trying to make a real impact on the App Store, that's a huge strategic advantage.
Building a Rock-Solid Development Environment

Before you write a single line of code, you need a stable, professional development environment. Trust me, a poorly configured setup is a one-way ticket to constant friction, cryptic errors, and hours of wasted time. Getting this right from the very beginning is absolutely essential for a smooth workflow.
Since we’re targeting iOS, all development has to happen on a Mac. This is a non-negotiable requirement straight from Apple. Your main tool will be Xcode, Apple's integrated development environment (IDE), which you can install directly from the Mac App Store.
Once Xcode is installed, you’ll also need to install its command-line tools. These are critical for letting Flutter communicate with the underlying iOS build systems. Just open your terminal and run a simple command: xcode-select --install. Easy.
Installing and Managing Flutter
With Xcode sorted, it's time to install the Flutter SDK itself. You can download the official package from the Flutter website and add it to your system's PATH, which makes the flutter command available from anywhere in your terminal.
But let's be realistic. A professional workflow often means juggling multiple projects, and those projects might rely on different versions of Flutter. Trying to manage this manually is a recipe for disaster. This is where a version manager becomes your best friend.
For any serious developer or agency, using a tool like FVM (Flutter Version Management) is standard practice. It lets you install multiple Flutter SDK versions side-by-side and switch between them on a per-project basis. This simple step prevents countless dependency conflicts and keeps your projects stable.
With FVM, you can lock a project to a specific Flutter version with fvm use <version>. From then on, all flutter commands are run as fvm flutter. This small change saves an enormous number of headaches down the line. To see how we structure our projects for maximum efficiency, you can learn more about our Flutter development process.
Verifying Your Setup with Flutter Doctor
So, how do you know if you've got everything right? Flutter comes with a brilliant diagnostic tool called flutter doctor. Running this command in your terminal scans your system for every component and dependency you need.
It checks for pretty much everything:
- The Flutter SDK and its location.
- Connected devices, including the iOS Simulator.
- Your Xcode installation and command-line tools.
- Other tools like Android Studio or VS Code.
The green checkmarks in the output mean you're good to go. If you see a red x or a yellow !, the tool gives you clear, actionable instructions on how to fix the problem. It makes troubleshooting incredibly straightforward.
Using the iOS Simulator
Finally, you need a way to see and test your app. The iOS Simulator, which is bundled with Xcode, is perfect for this. It lets you run and debug your Flutter app on a virtual iPhone or iPad right on your Mac.
You can fire it up by running open -a Simulator in your terminal or by launching it from within Xcode. Once it's running, Flutter will automatically see it as an available device. You can then get your app running with flutter run and see your changes appear instantly thanks to Flutter's Hot Reload feature.
This tight feedback loop is exactly what makes Flutter development so productive and, frankly, enjoyable. With this solid foundation in place, you're officially ready to start building.
Crafting an Unforgettable User Interface
With your development environment good to go, it's time to focus on what users will actually see and touch: the user interface. A solid setup is your launchpad, but the UI is what makes or breaks an app's success. This is where Flutter's incredible widget library really shines, giving you everything you need to build something responsive, visually stunning, and memorable.
When you develop an iOS application, the aim is to create an experience that feels completely natural on an iPhone. Flutter lets you nail this pixel-perfect native feel without writing a separate codebase. The secret is its two main widget sets: Material (Google’s design language) and Cupertino, which is meticulously built to mirror Apple's iOS design philosophy. Getting this right is crucial if you want iOS users to feel instantly at home.
Choosing the Right Widgets for iOS
To deliver an authentic iOS experience, you need to lean heavily on Cupertino widgets. They cover everything from navigation bars and tab bars to date pickers and alert dialogs, all designed to match Apple's Human Interface Guidelines. Skipping this step is a common mistake that leaves an app feeling clunky and out of place on an iPhone.
That doesn't mean you have to ditch Material Design entirely, though. A smart approach is to conditionally render widgets based on the operating system. With a simple check like Platform.isIOS from Dart's dart:io library, you can show a CupertinoNavigationBar on iOS and a standard AppBar on Android, all from the same code. This is how you make an app feel truly native everywhere.
Structuring Your UI with Core Layouts
Building complex screens in Flutter always comes back to a handful of fundamental layout widgets. Once you master these, you can effectively organise any UI element you can think of. They're the true building blocks of your app's entire visual structure.
Here are the essentials you’ll use constantly:
- Container: Your most versatile tool. Use it to wrap other widgets with padding, margins, borders, and background colours. It’s your go-to for controlling spacing and styling.
- Row & Column: These are the workhorses for arranging widgets.
Rowlines things up horizontally, andColumnstacks them vertically. You’ll find they form the backbone of most screen layouts. - Stack: Need to overlap widgets?
Stackis your friend. It’s perfect for placing text over an image or an icon on top of a button, letting you layer elements freely. - ListView: For any kind of scrollable list,
ListViewis indispensable. It's incredibly efficient and can handle long, dynamic lists without breaking a sweat.
The real power comes from combining these simple widgets to construct almost any layout you can imagine. This compositional approach is one of the best parts about building UIs in Flutter; it's both logical and incredibly creative.
Making Your UI Dynamic with State Management
A static interface is a dead interface. Users expect your app to react instantly when they tap a button, type in a field, or favourite an item. That immediate visual feedback is handled by state management. It’s the brain behind your beautiful UI, controlling how data changes and how the interface updates in response.
Flutter has several great state management solutions, but for projects that need to scale, Provider and BLoC (Business Logic Component) are two of the most popular choices.
- Provider is often the recommended starting point. It’s a straightforward, efficient way to pass data down the widget tree, making it easy for different parts of your UI to access and listen for changes.
- BLoC offers a more structured pattern that cleanly separates your business logic from your UI code. As your app gets more complex, this separation makes it much easier to test and maintain.
The "right" choice depends on your project's scale, but the core principle is always the same: separate your UI from your logic. This keeps your code clean and manageable, which is absolutely vital for any professional project.
Building a great UI is more than just making something that looks good. It's about crafting an experience that feels intuitive, responsive, and perfectly aligned with user expectations. On the competitive UK App Store, a seamless UX is not just a feature—it's a critical factor for success.
Focusing on iOS users is a particularly smart strategy in the UK. While Android leads globally, the UK market shows a strong preference for iOS, often linked to its more affluent user base. In fact, global data shows iOS accounts for a staggering 67% of app spending. This suggests UK users are more willing to invest in high-quality apps. You can read more statistics on Android vs iOS to get a clearer picture of the market. This makes a polished, native-feeling iOS app an incredibly valuable asset.
Weaving in Your Core App Logic
Once you’ve got a stunning user interface, it’s time to breathe some life into it with solid business logic. A beautiful UI is really just a shell without a powerful engine driving it. That engine is your core logic—it's what handles user input, manages data, and makes the app actually do things. When you set out to develop an iOS application, writing clean, scalable, and maintainable Dart code is what separates a decent app from a truly great one.
This is the point where we shift from thinking about pixels to thinking about programming patterns. The goal isn't just to make things work; it's to structure your app's logic so it can grow and adapt without turning into a tangled mess down the line. A huge part of this comes down to how data flows through your application, a concept better known as state management.
Choosing the Right State Management Strategy
In the world of Flutter, "state" is just a simple way of describing any data that can change over time. It could be the text a user types into a login form, the items in a shopping cart, or even the on/off toggle of a settings switch. How you decide to manage these changes is one of the most critical architectural decisions you'll make for your app.
Let's take a simple to-do list app as an example. When a user taps a checkbox to mark a task as complete, the UI needs to react instantly, maybe by striking through the text. That's state management in action. The app's state (the task's completion status) changes, and the UI rebuilds itself to show that new state.
The Flutter ecosystem has several popular solutions, each with its own pros and cons:
- Provider: This is often the first stop for beginners, and for good reason. Provider is a simple but surprisingly powerful tool for what's called dependency injection and state management. It essentially makes a piece of data (your "state") available to any widget that needs it, without you having to manually pass it down through layers of code.
- Riverpod: Built by the same person who created Provider, Riverpod is often seen as its more powerful successor. It elegantly solves many of the common headaches you might run into with Provider, offering compile-time safety and a much more flexible, decoupled structure. It’s a fantastic choice for apps of any size.
- BLoC (Business Logic Component): For more complex apps, the BLoC pattern is a lifesaver. It creates a very clear separation between your UI and your business logic by using streams to manage the flow of events and states. This approach makes your code incredibly easy to test and much simpler to reason about as your app grows.
Picking the right state management approach from the get-go is vital. For a small project, Provider might be all you need. But if you’re building an application you expect to scale, investing the time to learn Riverpod or BLoC will pay off massively in the long run.
Handling Asynchronous Operations with async/await
Modern apps rarely live in a bubble; they almost always need to talk to the outside world. This usually means fetching data from an API, saving something to a database, or reading a file from the phone's storage. These are all asynchronous tasks—they don't happen instantly.
Thankfully, Dart gives us a clean and highly readable way to handle these operations using async and await. You can think of it like ordering a coffee. You place your order (the async operation), and then you await the barista calling your name. While you're waiting, you aren't just frozen in place; you're free to do other things, like check your phone.
In our to-do list app, fetching the list of tasks from a server is a classic example. You'd mark the function with async and then use await to pause its execution until the network request finishes and returns the data. This simple trick prevents the UI from freezing up, ensuring the user has a smooth experience. This becomes even more critical for complex integrations, like when you create a cloud application with Flutter and Google Cloud.
Organising Your Project for Scalability
As your app gets bigger, so does your codebase. Without a logical structure, your project can quickly become a maze that's difficult to navigate. A well-organised file structure isn’t just a nice-to-have; it's absolutely essential for working in a team and for long-term maintenance.
A common and highly effective approach is to group your files by feature. For our to-do app, you might have folders that look something like this:
lib/features/auth/(for login/signup screens and logic)tasks/(for the task list, task details, etc.)models/(task_model.dart)views/(task_list_screen.dart)widgets/(task_item_widget.dart)bloc/(tasks_bloc.dart)
core/(for shared code like API clients, constants, etc.)main.dart
This structure keeps all the related files together, making it much easier to find what you're looking for and to understand how different parts of the app are connected.
The UK mobile app development scene has exploded in recent years, and user expectations have skyrocketed with it. The Apple App Store alone is home to over 1.9 million apps globally. Here in the UK, British developers have published over 25,000 apps, with each one averaging around 395,000 downloads. This points to a vibrant and demanding user base that won't settle for anything less than high-quality, functional applications. Building your app with a solid logical foundation is your ticket to competing effectively in this bustling market.
Testing Your App for a Flawless Launch
After pouring so much time into your app's UI and business logic, this is where the rubber meets the road. Thorough testing isn't just a box to tick; it's the single most important thing you can do to guarantee a great user experience and dodge those painful one-star reviews. When you develop an iOS application, cutting corners here is a recipe for disaster.
The good news? Flutter was built with testing in mind, offering a powerful, layered approach to squash bugs before your users ever see them. It champions a concept called the testing pyramid, which helps you focus your efforts where they'll have the most impact. It’s all about building a solid foundation of tests, starting small and working up to the big picture.
This structured process ensures your app is solid from the inside out, covering everything from the smallest function to the entire user journey. It's a systematic way to build real confidence in your codebase.
Understanding the Flutter Testing Pyramid
The testing pyramid is a simple but brilliant model. It’s split into three layers, and by using all three, you create a comprehensive safety net that catches different kinds of problems.
Here’s a look at the various testing types you’ll be working with in Flutter, each with its own specific job.
| Test Type | Purpose | Example Use Case |
|---|---|---|
| Unit Tests | Verify a single, isolated piece of logic, like a function or method. Fast and numerous. | Checking if a currency formatting function always returns the correct string. |
| Widget Tests | Check individual UI components for rendering, interaction, and state changes. | Tapping a button and verifying that a new piece of text appears on the screen. |
| Integration Tests | Test the complete app or a large feature, simulating a real user's workflow. Slower but vital. | Simulating a full login process, from entering credentials to landing on the dashboard. |
This table neatly breaks down how each test contributes to the overall quality of your app. Combining them gives you the best defence against bugs.
The real magic of this layered approach is catching issues early. By running these tests automatically every time you make a change, you spot regressions the moment they happen. This saves a massive amount of time and headaches compared to finding and fixing bugs after launch.
Preparing Your App for Distribution
Getting your app ready for real-world testers involves more than just writing code. You'll need to jump into Xcode to handle a few practical steps that define your app's identity on an iPhone.
This means creating a full set of app icons for different screen sizes and resolutions, plus setting up the launch screen that users see for a split second while your app loads. You’ll also need to manage different build configurations—Debug for development and Release for the final, optimised version you ship to the App Store.
To really streamline this, it's worth exploring what is possible with continuous integration for Flutter apps. Setting up a CI/CD pipeline can automate your entire build, test, and deployment process.
Beta Testing with TestFlight
Once your app is built and configured, the final hurdle before a public launch is getting it into the hands of real people. This is exactly what Apple’s TestFlight is for.
TestFlight is a fantastic, free platform that lets you distribute beta versions of your iOS app to a chosen group of testers. You can invite your internal team or external users with a simple email link.
Testers can then download the beta app and provide feedback directly through the TestFlight app, which also includes automatic crash reporting. This feedback loop is absolutely priceless for finding those last few quirks and polishing your app for a smooth debut on the App Store.
Navigating the App Store Submission Process
You've built your app, tested it, and polished it. Now for the final hurdle: submitting it to Apple’s App Store. This stage can feel a bit daunting, and it's true that Apple’s review process is famously thorough. But don’t worry – it's less about luck and more about methodically ticking every box on their checklist.
Your command centre for this entire operation is App Store Connect. This is where you'll create your app’s official listing, manage all its metadata, upload your builds, and eventually, keep an eye on its performance once it's live. Getting this part right is absolutely crucial for your app's visibility and success.
Think of it as the dashboard for everything from your app's description and pricing to TestFlight beta testing and user analytics.
Preparing Your App Store Listing
Your app's listing is its digital shopfront, and you only get one chance to make a first impression. Before you can even think about submitting, you need to get several key assets ready to go.
- App Description: Be clear and compelling. What does your app do? What are its killer features? Most importantly, what value does it bring to the user?
- Keywords: Get inside your target audience's head. What terms would they search for to find an app like yours? Choose relevant keywords that will help them discover you.
- Screenshots & Previews: This is non-negotiable. You need high-quality screenshots and, ideally, a short app preview video. They must be an honest reflection of your app's current functionality and meet Apple's specific dimensions.
- Privacy Policy: Having a clear, easy-to-find privacy policy isn't just good practice; it's a strict requirement, especially with UK and EU regulations like GDPR in full force.
A surprisingly common reason for rejection is a simple mismatch. If your app description promises features that aren't there, or your screenshots show an outdated version of the UI, you'll get flagged. Keep it honest and current.
Avoiding Common Rejection Pitfalls
Apple rejects a huge number of apps, but many of the reasons are entirely preventable. Your best defence is to know their guidelines inside and out. The most frequent tripwires relate to performance, design, and legal compliance.
Make absolutely sure your app is free of crashes and obvious bugs. Following Apple's Human Interface Guidelines is also essential; an app that doesn't feel like a native iOS app is on thin ice from the start. And, of course, be completely transparent about any user data you collect.
This meticulous approach is particularly vital for UK developers. The UK is a powerhouse in the European digital market, which collectively generated an astounding $94.2 billion from the Apple App Store in 2024. Even though Android has more users globally, iOS apps pull in 2.5 times more revenue per user, making it an incredibly lucrative platform. This high-stakes environment means that meeting Apple’s stringent standards isn’t just about getting approved—it’s about competing successfully. You can find more fascinating insights on the UK app market over at 42matters.com.
Once your assets are polished and your build is ready, you'll upload it through Xcode or your CI/CD pipeline. Then, you hit 'Submit for Review' and wait for the verdict, which usually takes a couple of days. If you’ve been diligent and thorough, you've massively increased your chances of a smooth, first-time approval.
Still Have Questions About Flutter for iOS?
When you’re looking at how to develop an iOS application, it's only natural to weigh up your options. We find a lot of our UK clients are curious about Flutter, but they often have some very sensible questions about performance, cost, and just how well it plays with the App Store. Let's tackle the big ones.
Why Choose Flutter Over Native Swift?
Look, Swift is fantastic. It’s Apple’s own language, so it offers incredibly deep integration with the iOS ecosystem. But Flutter’s superpower is its single codebase. You write your app once, and it runs beautifully on both iOS and Android. That’s a massive saving in development time and, ultimately, money. For startups trying to get to market quickly or established businesses looking to streamline their mobile teams, this is a game-changer.
Then there's performance. The old idea that cross-platform means slow and clunky is just that—old. Flutter doesn't use web views; it has its own high-performance Skia graphics engine that paints directly to the screen. The result? Buttery-smooth animations and a snappy, responsive feel that iOS users absolutely demand. Recent benchmarks consistently put Flutter at the top for performance, right alongside—and sometimes even better than—their native counterparts.
Flutter isn't a compromise; it's a strategic choice. For most applications, it delivers a truly native experience, incredible UI flexibility, and significant business advantages without sacrificing the performance users demand.
How Hard Is App Store Approval?
Apple's review process has a reputation for being tough, and honestly, that's a good thing. They’re laser-focused on quality, security, and protecting user privacy. It’s not a mystery box, though. From our experience, most rejections come down to completely avoidable things: persistent bugs, vague app descriptions, or simply ignoring Apple's Human Interface Guidelines.
Want to give yourself the best shot at a smooth approval? Here’s what we always recommend:
- Test, test, and test again: Get your app onto TestFlight and into the hands of real users. They’ll find crashes and awkward usability moments that you might have missed, long before an Apple reviewer does.
- Be upfront and clear: Your app description needs to be accurate, and your privacy policy must be comprehensive. This is particularly critical if you're targeting UK and EU users.
- Respect the platform: An app should feel like it belongs on an iPhone. Using Cupertino widgets for things like date pickers and alerts makes a huge difference to the user experience.
What Are the Main Costs Involved?
Breaking down the cost of an iOS app is pretty straightforward. First up, you have the non-negotiable Apple Developer Program membership. In the UK, that's an annual fee of around £79, and you absolutely need it to get your app on the App Store.
Beyond that, the costs are more variable:
- Development: This will always be your biggest outlay. The cost of hiring a UK-based Flutter agency versus building your own team can differ wildly. The good news is that Flutter already helps contain this by removing the need for a whole separate Android development team.
- Backend Services: Think servers, databases, and any third-party APIs you might need. The more complex your app, the more these costs can creep up.
- Marketing: You can build the best app in the world, but if nobody knows it exists, it won’t succeed. A solid budget for marketing your app after launch is essential for getting those initial downloads.
Ready to build a high-performance iOS app that stands out? App Developer UK specialises in creating stunning, scalable applications with Flutter. Let our expert UK-based team bring your vision to life. Find out more at https://app-developer.uk.